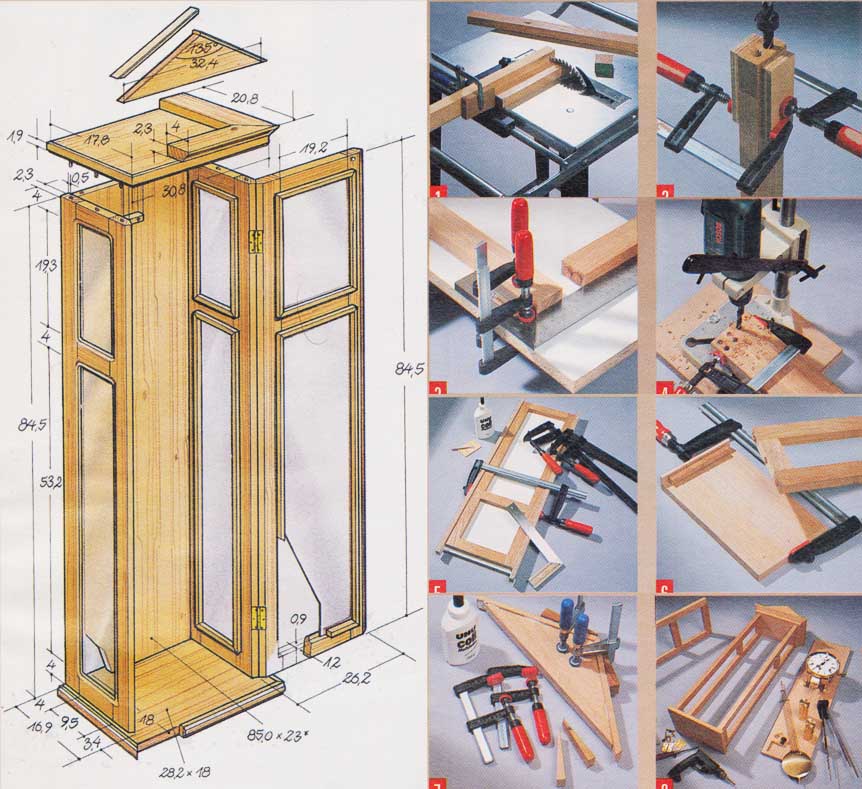
 The figure shows the construction and dimensions of the wall clock.
You can also read from it, that bottom, the top plate of the clock and the decorative element above the top profile are provided with glued solid wood elements, covering the edges of the cut.
At the beginning, before we discuss the steps involved in building a clock, we would like to give you some advice – especially regarding the choice of wood species and its quality.
To make the clock case, you need commercially available planed strips with a rectangular cross-section. In the store, you should choose only perfectly straight slats and cut out the best sections from them. Trimming oak veneered blockboards to the bottom, we commissioned the top cover and the rear wall from a shop, where we found boards with a matching veneer pattern. Let's remember, that the strips and boards must perfectly harmonize with each other. To make the wall clock shown in the photo, you need a few popular power tools, usually present in every workshop. One of them is a good table saw for trimming slats, drill with a stand for drilling holes for dowels and a milling machine for profiling or milling rebates for glass panels.
In addition to standard hand tools, you need a precision miter saw and a sharp planer plane, so that the glued strips and veneered boards can be on one level. Other necessary tools are shown in the working photos.
Clock case dimensions, thus the dimensions of both side walls and the door, are given in the picture.
Oak slats can be bought by the meter. Using a table saw, we cut out from them the vertical and transverse elements of the clock case. The transverse frame members at both ends have blind holes for wooden dowels. A drill template ensures that the distances are kept constant. The angle bar fixed on the state serves as a limiter when transferring the hole pattern. Run the transverse element along the angle. For drilling holes under
pegs (using a drill stand) we put together three or four slats. They create a better retaining surface. Glue the frames of walls and doors on a flat one, coated support plate. The fairly thick fence slats ensure even pressure distribution. An additional stop is attached to the bottom and top plate of the clock. It sets the distance when selecting the position of transferred holes. The glued strips finishing the upper cut edges of the cabinet top are fastened with wooden wedges and carpentry clamps. Cut off the protruding ends of the slats. We connect the entire housing to the test, matching all the elements. Prepare the back wall for mounting the clock mechanism and the pendulum.